On Saturday I sent W to the store for Super Bowl groceries and he came back with a pork shoulder. "What do you want me to make?" I asked. "I know you'll think of something." I love that confidence!
Anyway, I was either going to do David Chang's Bo Ssam or this ramen recipe and I opted for this one since it would just be the three of us (technically four) eating it. I didn't add all the extras because I'm a little pressed for time nowadays, but the result was still really delicious. I took the time to caramelize the pork because I felt like that was worth it. I omitted the curry paste and hot sauce because V can't handle spicy yet. We ate it with pho noodles since I had some in the fridge.
Thank you, Half Baked Harvest, for a delicious recipe! Someday I hope to make the full recipe but just the broth and pork themselves were worth it.
Crockpot Caramelized Pork Ramen
Tuesday, February 3, 2015
Tuesday, December 23, 2014
Blackberry Scones
I'm getting close to my due date which means that I need to try and cook/bake as much as possible before I get banned from my kitchen.
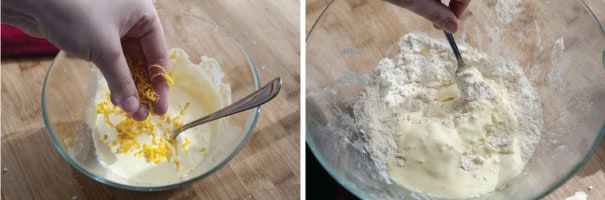
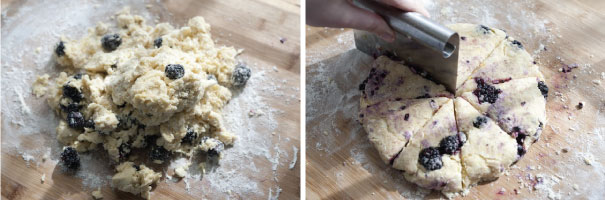
Blackberries were the inspiration for these scones, but they were just as good without the blackberries, too. They were light and lemony. I think you could easily use this as a base for other berries or even chocolate chips.
Thanks to Joanne and Adam Gallagher of Inspired Taste for creating this recipe! The website has a great step-by-step tutorial as well. Grating butter is definitely the way to go for maximum butter distribution. I had to substitute yogurt for sour cream which made the batter a little too moist but I just dropped them like biscuits and baked them for 16 minutes. This yielded 12 smaller scones for me.
Blackberry Scones
You Will Need
- 2 cups all-purpose flour
- 1/3 cup + 1 tablespoon sugar
- 1 teaspoon baking powder
- 1/4 teaspoon baking soda
- 1/2 teaspoon salt
- 1/2 cup unsalted butter, frozen
- 1/2 cup sour cream, cold
- 1 egg
- 1 tablespoon grated lemon zest
- 1 container (6 oz) fresh blackberries
Directions
- Heat oven to 400°F. Line cookie sheet with parchment paper or aluminum foil.
- In a large bowl, mix flour, 1/3 cup sugar, the baking powder, salt and baking soda.
- Now, use a box grater to grate butter into flour mixture OR cut the butter into small cubes then work in with fingers until mixture looks like coarse meal.

- In a small bowl, whisk sour cream, egg and lemon zest with a fork then add to flour and butter. Use the fork to stir everything together until just moistened. Add blackberries and gently stir into dough. Don't worry if some of the berries are smooshed or crushed a bit.
- Empty the loose dough out onto a clean, floured work surface then shape the dough into a 7-inch circle then cut the dough into 8 wedges and carefully transfer to the baking sheet. Sprinkle the top of each scone with the remaining sugar and bake 14 to 16 minutes or until light golden brown. Cool 5 to 10 minutes. Serve warm.
Notes and Tips
Use a box grater with large holes for grating the stick of butter, and make sure it’s very cold for best results.
Store cooled scones in an airtight container at room temperature 1 to 2 days or in the refrigerator 3 to 4 days. They can also be frozen up to 3 weeks.
Store cooled scones in an airtight container at room temperature 1 to 2 days or in the refrigerator 3 to 4 days. They can also be frozen up to 3 weeks.
Monday, December 22, 2014
Homemade Wonton Wrappers
I ran out of wonton wrappers and found this recipe online. It was easy to make and the hints on the website were very helpful.
Thanks to Kitchen Simplicity for posting this!
Wonton Wrappers
Thanks to Kitchen Simplicity for posting this!
Wonton Wrappers
HOMEMADE WONTON WRAPPERS

Cuisine: Asian
Serves: 24 wrappers
INGREDIENTS
- 2 cups flour
- 1 egg
- ¾ tsp. salt
- ¼ -1/2 cup water
INSTRUCTIONS
- Sift flour into a large bowl and make a well in the centre. Whisk together egg, salt and ¼ cup water. Pour into flour well. Mix together, adding additional water until the mixture will stay together in a ball. (You may need more or less then ½ cup, use your discretion. Keep in mind that you do not want it to be sticky.)
- Knead the dough until it becomes smooth and pliable.
- Let rest for 30-60 min. (This is so the gluten can relax. The longer it sits the easier it will be to roll out)
- Divide dough in half. Keep one half covered while you roll out the other one on a surface lightly coated with cornstarch (if you use flour it may toughen it up). Roll out as thin as you possibly can.
- Cut into 3.5 inch squares (You should be able to get approx. 12 wonton wrappers out of each half).
Sunday, December 21, 2014
Japchae
Fun fact: our family used to eat japchae cold because it was in the refrigerated section of the Korean market and we didn't know any better. Now I know that it's a lot more delicious as a hot dish. What were we thinking?
The recipe I've been using comes straight from the bag of japchae noodles. I probably modify the technique/ingredients a little bit to make it faster but otherwise everything else is the same.
Thanks to ASSI for printing the recipe.
Ingredients:
1.1 lbs of ASSI Dangmyeon
7 oz of beef
5 pieces of shitake mushroom
5 pieces of black mushroom
1 carrot
1 bunch of spinach
1 onion
1 egg
For sauce
6 Tbsp of soy sauce
1 Tbsp of sugar
2 tbsp chopped green onion
1 tbsp of minced garlic
1 tbsp of sesame oil
Roasted sesame seeds
Instructions:
1. Slice the beef, shiitake mushrooms, black mushrooms, carrot and onion and fry them until fully cooked.
2. Parboil the spinach and after cooking rinse it under cold water. After draining the water, mix the spinach with salt, sesame oil and minced garlic.
3. Separate the egg whites from the yolk and cook them separately using a fry pan. After cooking, slice them into strips.
4. Mix all the ingredients for the sauce. Cook the ASSI Dangmyeon noodles in boiling water for 4-5 minutes. Afterwards drain the noodles and rinse thoroughly under cold water. Mix all the ingredients with the sauce and noodles and cook everything under medium heat in a fry pan.
.JPG)
Thanks to ASSI for printing the recipe.
Ingredients:
1.1 lbs of ASSI Dangmyeon
7 oz of beef
5 pieces of shitake mushroom
5 pieces of black mushroom
1 carrot
1 bunch of spinach
1 onion
1 egg
For sauce
6 Tbsp of soy sauce
1 Tbsp of sugar
2 tbsp chopped green onion
1 tbsp of minced garlic
1 tbsp of sesame oil
Roasted sesame seeds
Instructions:
1. Slice the beef, shiitake mushrooms, black mushrooms, carrot and onion and fry them until fully cooked.
2. Parboil the spinach and after cooking rinse it under cold water. After draining the water, mix the spinach with salt, sesame oil and minced garlic.
3. Separate the egg whites from the yolk and cook them separately using a fry pan. After cooking, slice them into strips.
4. Mix all the ingredients for the sauce. Cook the ASSI Dangmyeon noodles in boiling water for 4-5 minutes. Afterwards drain the noodles and rinse thoroughly under cold water. Mix all the ingredients with the sauce and noodles and cook everything under medium heat in a fry pan.
Friday, December 19, 2014
Pan-Seared Tilapia
Usually I steam fish for dinner (Chinese-style, and not as elaborate as my previous post because frankly, I'm too lazy) but I like experimenting and seeing how V responds to fish cooked in different ways. She likes it steamed and deep-fried, so pan-fried wasn't too much of a risk.
This recipe was nice because she could help, too. I let her help me coat the fish with flour (which I now consider essential for pan-fried fish because it prevents the fish from sticking to the pan.) She ate almost an entire filet by herself. I didn't even have to use butter at the end.
Thanks to AppleChef for this delicious recipe! I'm grateful for fast seafood recipes.
INGREDIENTS:
4 (4 ounce) fillets tilapia
salt and pepper to taste
1/2 cup all-purpose flour
|
1 tablespoon olive oil
2 tablespoons unsalted butter, melted
|
DIRECTIONS:
| 1. | Rinse tilapia fillets in cold water and pat dry with paper towels. Season both sides of each fillet with salt and pepper. Place the flour in a shallow dish; gently press each fillet into the flour to coat and shake off the excess flour. |
| 2. | Heat the olive oil in a skillet over medium-high heat; cook the tilapia in the hot oil until the fish flakes easily with a fork, about 4 minutes per side. Brush the melted butter onto the tilapia in the last minute before removing from the skillet. Serve immediately. |
Tuesday, December 16, 2014
Peanut Butter Cookies
My cousin just had a birthday and when I asked what dessert she usually likes best she answered "peanut butter." She's not a fan of chocolate so V and I made her classic peanut butter cookies.
There are hundreds of recipes for this but I was immediately drawn to Joanne Chang's version from Flour. I had her on the brain since I just started following her on Instagram and she posts pictures of pastries almost every day. Flour is our favorite bakery in Boston and I love Joanne's cookbook. I don't have the hard copy with me now but thankfully someone else posted the recipe on her blog.
Thanks to Joanne Chang and Madeline from Thursday Night Baking! These cookies are perfect. We halved the recipe and it still made almost 30 cookies. No stand mixer was required either- just some good old-fashioned elbow grease. 10 minutes wasn't quite long enough for us so I ended up somewhere around 13 minutes. The warm cookies were amazing with caramel swirl ice cream, and they were nice and crisp the next day.
Peanut Butter Cookies
Ingredients
- 1 cup (2 sticks) unsalted butter, room temperature
- 1 cup granulated sugar
- 1 cup brown sugar
- 2 eggs
- 1 teaspoon vanilla extract
- 1 3/4 cup chunky peanut butter (not all natural, there is too much oil in it. Stick with the Jiff!)
- 2 2/3 cups all purpose flour
- 1 teaspoon baking soda
- 1 teaspoon kosher salt
Instructions
- Preheat oven to 350º F.
- Using a stand mixer fitted with a paddle attachment, cream together the butter and sugars on medium speed until light and fluffy (about 5 minutes)
- Beat in the eggs and vanilla on medium speed for 2 minutes, or until combined. Scrape down the bowl and mix again to ensure completely mixed.
- On medium low speed, beat in the peanut butter for another 2 minutes.
- In a medium bowl, stir together the flour, baking soda, and salt until well mixed. On low speed, slowly add the flour mixture to the butter/sugar mixture, mix until just combined.
- Drop the dough in tablespoon sized balls onto ungreased baking sheet. Using a fork, make the traditional criss cross pattern on top of each cookie. Bake for 10 minutes, or until golden brown on the edges, but still pale in the center. Let cool on baking sheet for a few minutes, then transfer to a wire rack to cool completely.
Sunday, December 14, 2014
Taiwanese Three Cup Chicken
I made this for my in-laws and they liked it (or at least said they did!) I thought it was pretty on par with Three Cup Chicken that we've eaten at Taiwanese restaurants in Boston.
Thanks to Cathy Erway from Serious Eats (my new favorite food website)!
Taiwanese Three Cup Chicken
Thanks to Cathy Erway from Serious Eats (my new favorite food website)!
Taiwanese Three Cup Chicken
Ingredients
- 2/3 cup Asian sesame oil
- One (1-inch) piece fresh ginger, peeled and thinly sliced into rounds
- 12-15 medium garlic cloves, peeled
- 1-2 fresh Thai red chilis, stemmed and halved
- 2 pounds skin-on chicken drumsticks, thighs, and/or wings, either chopped into 3-inch, bone-in pieces, or thighs halved along along the bone, wings split at the joint, and drumsticks left whole
- 2/3 cup rice wine
- 2/3 cup soy sauce
- 1 tablespoon sugar
- 2 cups fresh Thai basil leaves (from 1 large bunch)
- Steamed white rice, for serving
Procedures
- 1Heat sesame oil in a large skillet or wok over medium-high heat until shimmering. Add ginger, garlic, and chilis and cook until very fragrant, about 1 minute.
- 2Add chicken pieces to the skillet in a single layer and cook, tilting the pan if necessary to submerge all pieces in the oil, for 1 minute. Flip chicken pieces and cook for 1 minute longer.
- 3Add rice wine, soy sauce, and sugar and bring to a boil, stirring to dissolve the sugar. Reduce heat to a simmer. Partially cover the skillet to prevent splashes of oil and cook, turning the chicken pieces every few minutes, until the chicken is cooked through, about 15 minutes. Stir in Thai basil and remove from heat. Serve immediately with rice.
Subscribe to:
Posts (Atom)